.jpg)
The code is available on GitHub
Let’s say you want to extract some information from paper prescriptions (to perform some trend analysis afterwards, or to simply check if the prescription is valid against a database; the exact reasons may vary and are not too important here). You could type them into a computer database manually and call it a day. But it gets tedious if the number of those to type in becomes large, and the time is precious. This is when Optical Character Recognition (OCR) techniques may come in handy.
OCR is an umbrella term encompassing a range of different technologies that detect, extract and recognise text from images. There exist a multitude of approaches for OCR from very simple ones, that can only recognise clear text in a specific font, to particularly advanced, that employ machine learning and can work with both printed and handwritten texts in multiple languages. We are going to focus our attention on two specific ones here.
What are our options?
In this article we are going with two specific OCR tools: Tesseract OCR and Google Cloud’s Vision API
Tesseract OCR is an offline tool, which provides some options it can be run with. The one that makes the most difference in the example problems we have here is page segmentation mode. In many cases, one might resort to run it in auto-mode, but it’s always useful to think about what the potential layouts of the documents might be and hence provide some hints to Tesseract, so it can yield more accurate results. For simplicity, I will not cover all of the modes available, but experiment with three, that, at least intuitively, might fit the layouts of the documents we are working with here:
- Single Block: the system assumes that there is a single block of text on the image
- Sparse Text: the system tries to extract as much text as possible, disregarding its location and order
- Single Column: the system assumes that there’s a single column of lines of texts
Google Vision, on the other hand, does not provide as much control over its configuration as Tesseract. However, its defaults are very effective in general. There are two distinct OCR models that are worth experimenting with:
- Text Detection model: detects and recognises all text on a provided image
- Document Text Detection model: practically performs the same task, but is tuned to better suit dense texts and documents
Into the first example
N.B. the full recognised text results are not provided here, for the sake of keeping the article readable. However, the reader is encouraged to play around with the notebook provided and see full results for themselves.
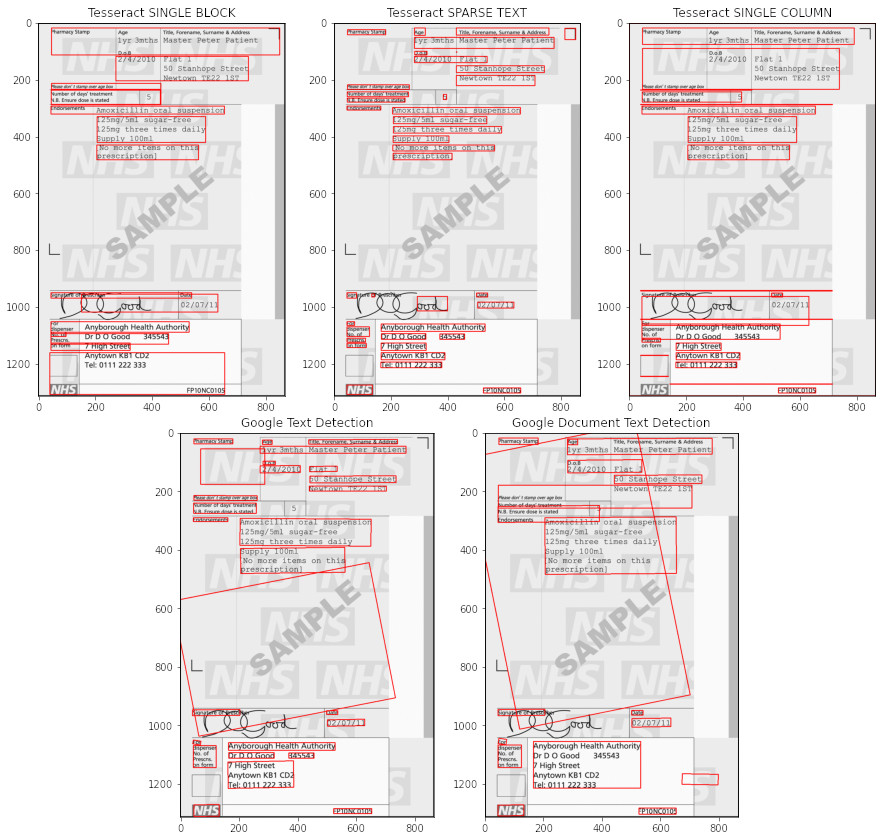
Starting with our first example: a scanned prescription for amoxicillin (kind of antibiotic). We will first look at how the methods described above handle this form as is.

Original source: https://bnf.nice.org.uk/guidance/prescription-writing.html
A couple of observations to make here:
- Both Single Block and Single Column Tesseract modes detect some spurious boxes as text (we may assume that the text is not dense enough for these modes)
- Both Google models detect the text on the watermarks, that is not relevant to our task
I will not be talking about the accuracy of the recognition yet, since there’s a way to improve the detection first!
Does image pre-processing help?
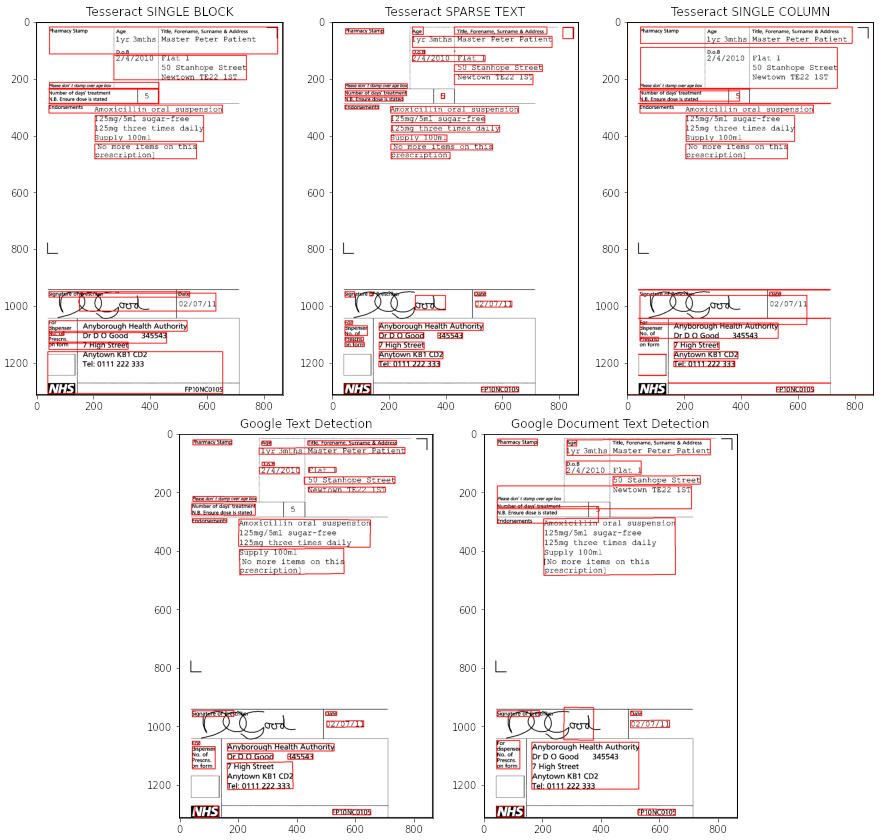
There’s, of course, a plethora of ways that images can be pre-processed before analysis, including but not limited to different ways of filtering and de-noising, lightning adjustments, sharpening, you name it. But here we don’t have to do anything too convoluted to remove the background. We can perform thresholding, an operation that turns an image into a binary one by setting the pixels to black if their intensity values are above a certain threshold, and to white otherwise. Conveniently, the OpenCV library provides a method to threshold the image. Instead of picking and hard-coding some specific threshold Otsu method can be used, which chooses the best threshold, based on the distribution of pixel intensities. The results after thresholding already look more promising. Let’s investigate what we see here.

- Tesseract’s results haven’t changed much (since it was not affected by the background anyway).
- However, Google’s results have definitely improved: no more unwanted elements are recognised.
- Tesseract’s Sparse Text mode still stands superior to the other two, detecting the layout correctly, and recognising most of the text without mistakes. There are some occasional extra characters inserted: for example “i 50 Stanhope Street”, where ‘i’ is not a real character, but part of the box to the left of the text.
- Google Document Text Detection model does not seem to perform well on this one, combining texts into a single paragraph when they clearly do not belong together. The possible reason here is that the text is not dense enough for that particular model.
- We can also see one of the weak sides of Google Vision: it sometimes fails to recognise short strings or lone characters standing on their own (Google Text Detection model failed to detect that single ‘5’ in the middle of the page). But overall, when the text was detected, it was indeed recognised correctly.
So, as you can see, there’s no one-size-fits-all model. In this particular case, after the experiment, I would go with either Tesseract Sparse Text mode or Google Text Detection model (leaning more towards the former, as the 5 and other single-digit numbers that may come in the following documents, that Google misses, might be quite important for the task), with the thresholding as the preprocessing step.
What about a different layout
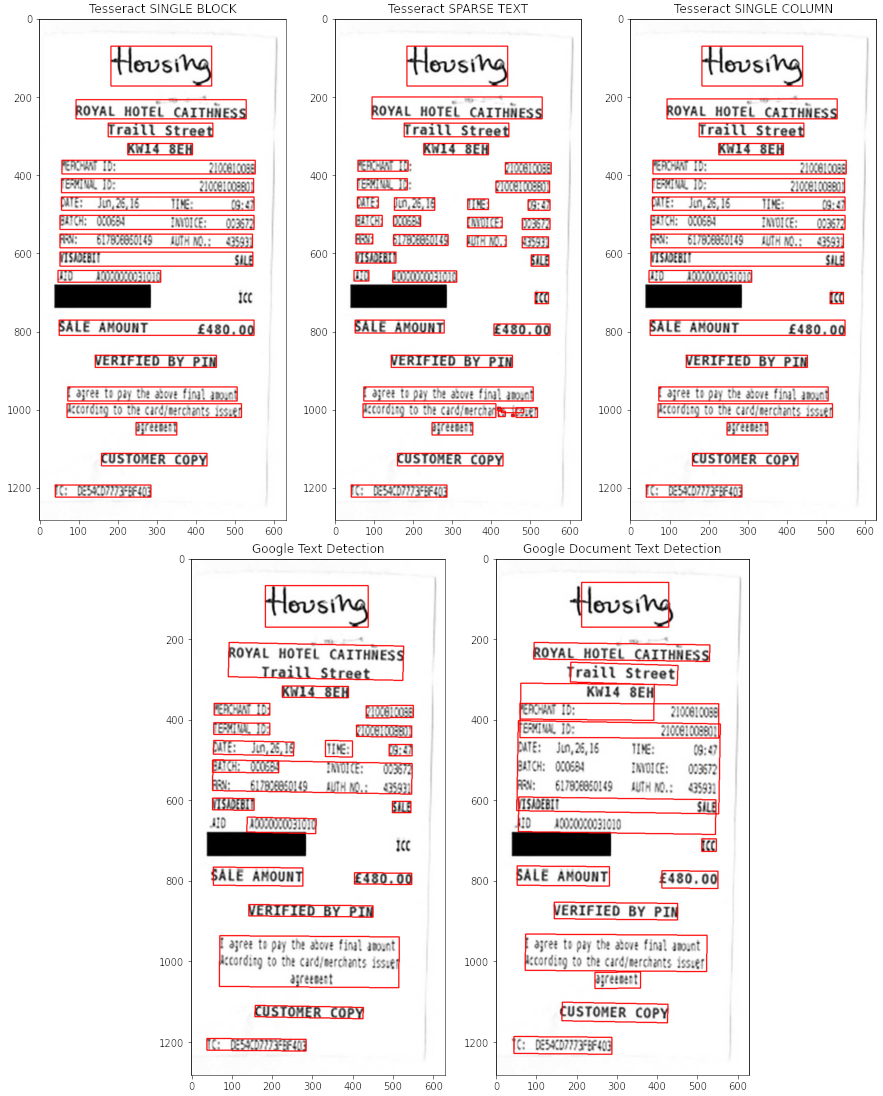
To illustrate that the nature of a document might influence the choice of a model, let’s go through another example. Here we have a receipt from a hotel, that was submitted to claim reimbursement.

Original source: https://www.imperial.ac.uk/staff-travel-and-expenses/whilst-you-are-travelling/obtaining-receipts-to-evidence-expenditure/receipt-examples/
- All three modes of Tesseract did a good job detecting the text on the image. However, Single Block and Column modes kept the lines of the text intact, which is convenient if you wants to match label-value pairs in the analysis afterwards.
- Tesseract’s recognition, on the other hand, is far from perfect (e.g. “MTE: Jin, 26,16 TIE: 03:4” instead of “DATE: Jun, 26, 16 TIME: 09:47”). My guess would be that it is due to a narrow font and the image quality not being the sharpest. Some pre-processing steps to improve edges of the letters might yield better results, but this is just a speculation, since this was not tested.
- In comparison, Google Vision recognises all the text with almost no errors, including the handwritten “Housing” (which Tesseract recognised as “‘stflrg”)
- The segmentation by the Text Detection model was again better in comparison to the Document Text Detection model, even though it breaks up some of the lines of text
At this point, I’d like to add a note on matching label-value pairs. Tesseract’s Single Column mode conveniently provides lines of the receipt, so the label-value pairs can be parsed trivially. However, if this was not the case (and it isn’t for the results of Google Vision), the pairs can still be matched if needed by using the coordinates of the detected text, which are provided by both Tesseract and Google.
In conclusion, even though Tesseract Single Column provides a nice layout, I would choose Google Vision for this task, as it provides much better accuracy of recognition (including the handwritten part, which is important for this particular example).
Take-home message
In this short blog post, we’ve compared how Tesseract OCR and Google Vision perform on two specific tasks, but this is by no means an exhaustive overview. When employing OCR, you need to consider the nature of the images you are working with, and experiment with different OCR models to find one that is the most suitable for their application. Additionally, the real-world data might not be as clean as the examples above, therefore some pre-processing steps might be required for recognition to be successful. And finally, even though this step is out of the scope of this post, it is worth mentioning, that after the recognition some post-processing might be required, such as removal of the extra characters, or spell-checking (it depends on what the further analysis is).
The notebook with the code producing the results for the examples in this post is available. The readers are highly encouraged to give it a try and experiment with their sample data.


.jpg)

.png)

.jpg)
