

.jpg)
The code is available on GitHub
In the previous post, we have explored how texts can be detected and extracted, using different OCR methods. This time we will dive into how non-textual information can be extracted. Let’s say we are running a survey, that includes a printed questionnaire to be filled in with some multiple choice questions (i.e. it contains checkboxes with labels assigned to them). In order to perform any analysis on this survey, we need to extract the data from this survey digitally. We do not want to record the results of a large number of questionnaires manually, as this is a laborious task. Hence, we need a way to detect those checkboxes automatically, so the forms can be processed in bulk.
For this task, we will be using OpenCV, a computer vision library, that provides a wide range of methods for image manipulation and analysis.
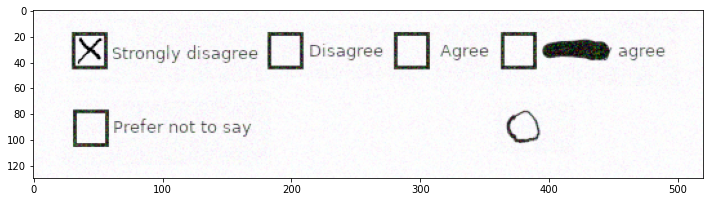
The original segment of a form for analysis
What are we working with? We have a section of the form that contains multiple checkboxes with the associated labels. Additionally, we have some artefacts (i.e. one of the labels crossed out with a thick line, and a hand-drawn circle in the corner) that might make our lives harder. For the purpose of the exercise, our task will be to correctly identify the locations and dimensions of the checkboxes present.
Image Preparation
Before we proceed with detection, we first want to try to separate our objects of interest (i.e. checkboxes) from the background, and, if possible, from other objects on the scene.
Thresholding
There exist multiple methods that can be used for preparing the image for the downstream task of object detection, the very simplest of which is thresholding.
Thresholding: an operation that turns an image into a binary one, where pixels with intensity level above a certain threshold are turned white, and all the rest of the image is turned black. Otsu’s method is used to determine an appropriate threshold automatically, using the distribution of intensity values.
_, img_bin = cv2.threshold(cv2.cvtColor(img, cv2.COLOR_BGR2GRAY), 0, 255, cv2.THRESH_BINARY | cv2.THRESH_OTSU)
img_bin = 255 - img_bin
The thresholded image is inverted since OpenCV considers white areas as “objects” and black areas as “background”, which is important for the downstream task
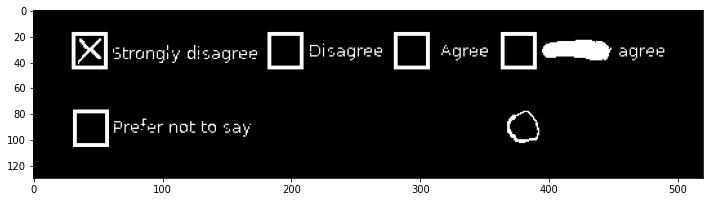
Thresholded image
The image is now ready for further manipulations, with the relevant objects highlighted and any potential background noise removed. But can we do better?
Opening
The thresholded image still contains some elements that are not needed for our task. We are only interested in vertical and horizontal lines that make up checkboxes, and, therefore, would like to get rid of text labels and any small artifacts that might be present on a page. We can attempt removing these elements using opening.
Opening: a morphological operation that removes everything that does not fit a structural element of certain dimensions. It is a compound operation that consists of the successive application of dilation and erosion.
We cannot find a structural element (sometimes called kernel), that would separate the boxes from the other object, for this image. However, we can do this in two steps: extracting vertical and horizontal components of the boxes separately, applying opening with vertically aligned and horizontally aligned rectangular kernels respectively. The resulting openings can then be combined together.
vertical_kernel = cv2.getStructuringElement(cv2.MORPH_RECT, (1,15))
vertical = cv2.morphologyEx(img_bin, cv2.MORPH_OPEN, vertical_kernel, iterations=1)
horizontal_kernel = cv2.getStructuringElement(cv2.MORPH_RECT, (15,1))
horizontal = cv2.morphologyEx(img_bin, cv2.MORPH_OPEN, horizontal_kernel, iterations=1)
img_opened = cv2.addWeighted(vertical, 0.5, horizontal, 0.5, 0.0)
_, img_opened = cv2.threshold(img_opened, 0, 255, cv2.THRESH_BINARY)
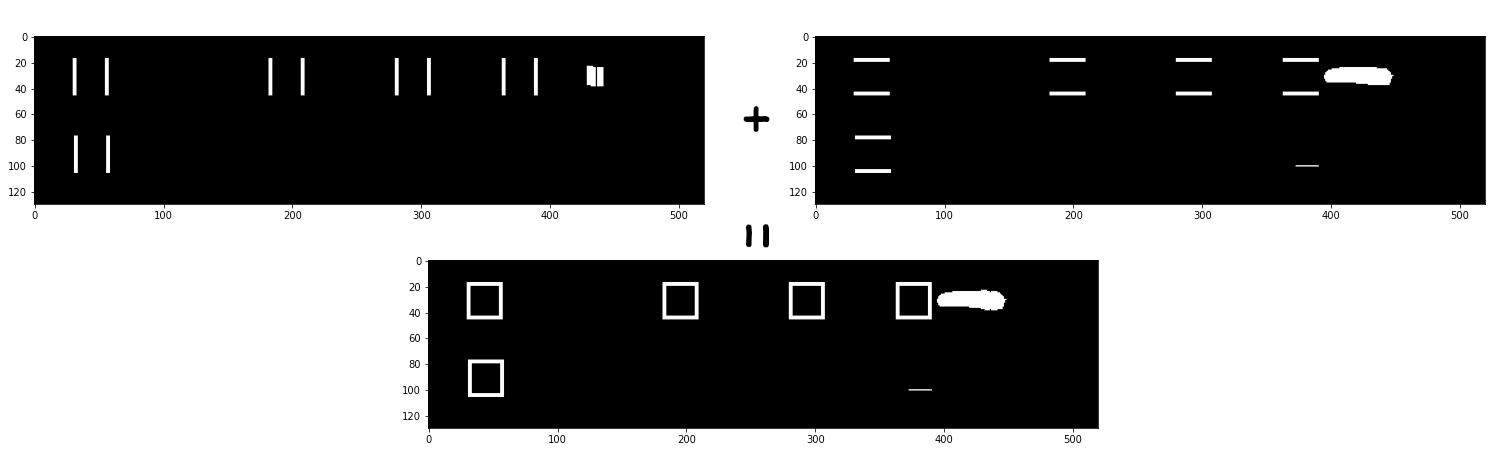
Results of opening applied to the thresholded image
Edge Detection
Alternatively, as we are only interested in the locations of the checkboxes and they have a sharp contrast with the background, to separate them out we can perform edge detection.
Edge detection: an operation that identifies locations of the image with a rapid change in intensity values. Here, we are specifically using the Canny edge detector. The specifics of the algorithm are not essential for the article, but it is worth noting that Canny detector, in comparison to some other simpler detectors, applies additional noise filtering and removes candidate edges that are too small or shallow (i.e. might be image artefacts)
CANNY_KERNEL_SIZE = 100
img_canny = cv2.Canny(img, CANNY_KERNEL_SIZE, CANNY_KERNEL_SIZE)
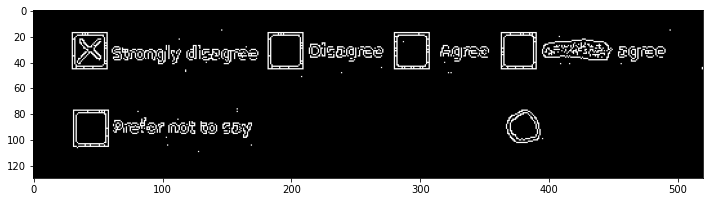
Results of edge detection
Contours
Having the image prepared, we next extract the contours (a set of points that define an entity) of every object on the scene (i.e. every ‘blob’ of white pixels present on the image).
def get_contours(img_bin):
contours, _ = cv2.findContours(img_bin, cv2.RETR_EXTERNAL, cv2.CHAIN_APPROX_SIMPLE)
return contours
We only keep the top level or external contours and plot them over the original image.
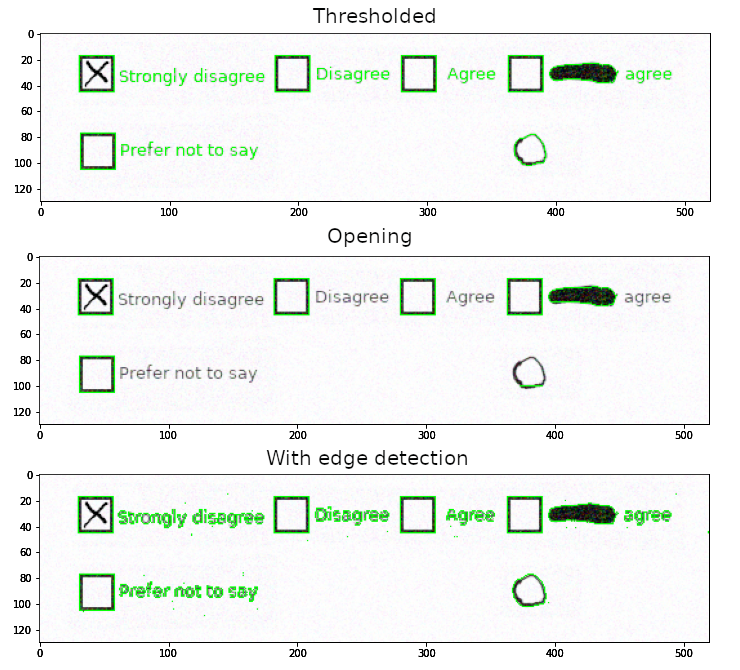
Contours for the objects after each preparation method
The good thing is that all checkboxes are detected, the bad thing, however, is that we still have plenty of unwanted objects. Therefore, we need to perform filtering to only include the contours for the objects of interest.
Contour Filtering
By Area
We know that our boxes are roughly 25 by 25 pixels, and hence have an area of roughly 625 pixels squared. Therefore, we can try to filter out all the contours which area is too small or too large with the following code.
def is_correct_area(contour, expected_area=625, tolerance=200):
area = cv2.contourArea(contour)
return abs(area - expected_area) <= tolerance
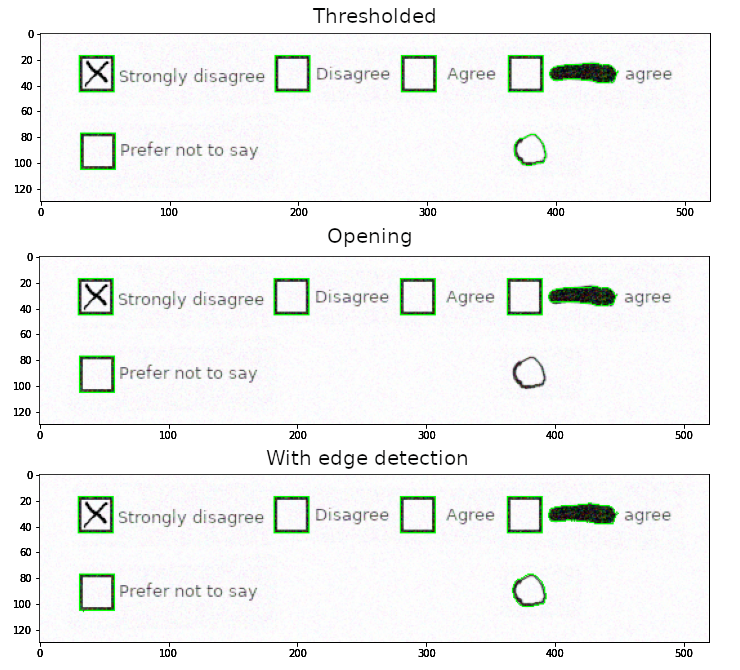
Contours after filtering for area
For all pre-processed images, this filter removes the contours of the text labels. But the crossed-out text’s and the circle’s contours are still present on the images with the simple thresholding and edge detection. So, this method is not robust enough for our purpose. It is worth noting, though, that this is not a problem for the image with the opening: the circle was broken down into smaller pieces enough to be filtered out with this method.
By Bounding Box
The previous results can be improved if we add the information on shapes. We can get bounding boxes (i.e. a minimal box that encloses a given contour) and filter out ones that do not have square dimensions.
def are_bounding_dimensions_correct(contour, expected_area=625, tolerance=200, squareness_tolerance=5):
area = cv2.contourArea(contour)
x, y, w, h = cv2.boundingRect(contour)
return abs(area - expected_area) <= tolerance and abs(w - h) <= squareness_tolerance
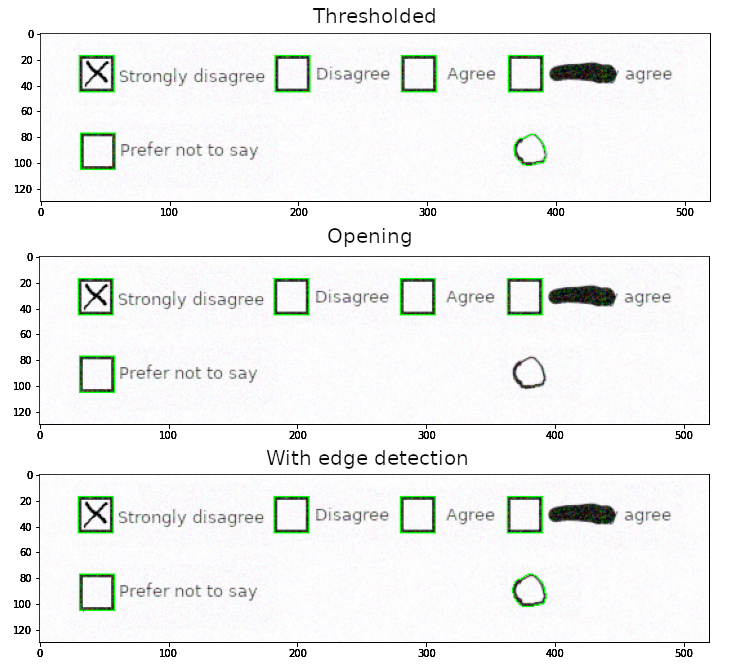
Contours after filtering for bounding box aspect ratio
This filter successfully removes the unwanted thick line, but the circle is still present, as its bounding box has a roughly square shape.
By Contour Matching
To combat that, we can compare contours directly instead of relying on their bounding boxes. We can define a template box of square shape, and filter out all the contours that do not match the template or do not match the area requirement (we still have to check if sizes are correct).
def is_contour_square(contour, contour_tolerance=0.0015, square_side=25, area_tolerance=200):
expected_area = square_side * square_side
area = cv2.contourArea(contour)
template = np.array([[[0, 0]], [[0, 1]], [[1, 1]], [[1, 0]]], dtype=np.int32)
return cv2.matchShapes(template, contour, 1, 0.0) <= contour_tolerance and abs(area - expected_area) <= area_tolerance
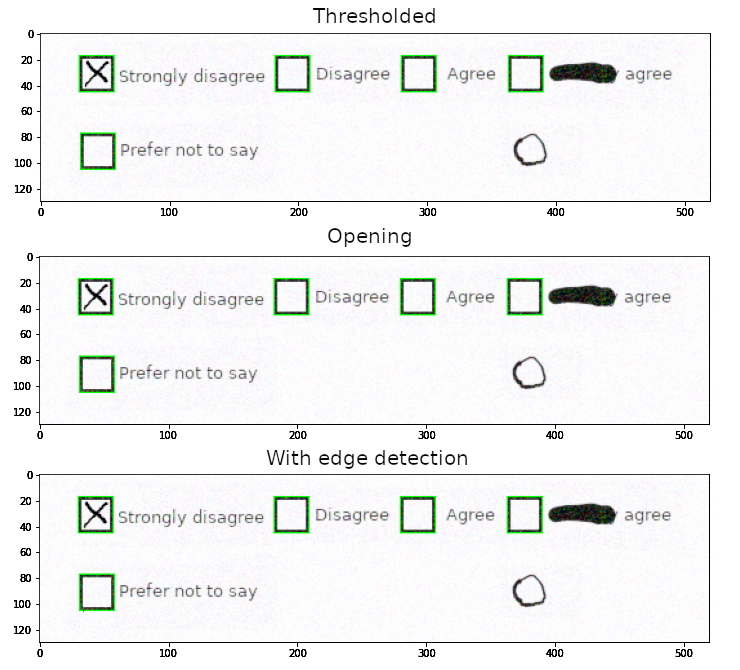
Contours after filtering for contour shape
Doing that, allows us to identify the shapes that closely match our desired template, and therefore filter out the unwanted objects, including the hand-drawn circle.
Bottom line
Having multiple methods of pre-processing and contour filtering tested, we can conclude that the combination of opening (since it removes most of the unwanted elements all by itself) and contour matching (since it provides high precision of filtering) works best for our task. The great thing is that a similar approach can be further extended to account for other elements that can be encountered in forms, simply by defining appropriate kernels and templates.
Of course, these exact methods are not applicable to every single problem that can be found in the real world, and some additional processing might be required: such as colour masking instead of thresholding, or denoising of the image as a pre-processing. Hence, the reader is encouraged to play around with the code provided, apply it to other problems and try to adapt it to suit their needs.
.jpg)

.png)

.jpg)

Sign up to our newsletter

Heron House
1 Lincoln Square, Manchester
England, M2 5LN
0161 533 0337